How to write a blog post
In this post, I like to show how to write a blog post with WordPress 5.9, basically the engine of this website. If you follow this tutorial and you are member of our website, you can write a post to share with all of us. So, I will show you in baby steps how to publish your beautiful post with all the required elements for a successful essay online. I recommend to read also my other post Start to write a post.
Although it is not really my favourite device, in this tutorial I use an iPad to show what to do. So, Chris won’t be lost. If we use your laptop, there is no differences, only you can see better with more space.
Bear in mind, we are creating this website for fun and to share between us our love for books and also recommend to each other good movies and TV Series about the LGBTQ+ community. So, be kind, polite and informative.
Login
First, you must have a valid account on Velvet Page to write a post. So, if you don’t have an account, you have to register yourself. If you already have an account, just login. After the login, you see a black bar at the top of the screen with a menu and in the top right corner, your name with your avatar.
If you want to change your avatar, you have to create an account on Gravatar and then upload the image you want to use. I have created a step-by-step guide in the community section and this is the link.
Start to create a new post
First, there are different way to add a new post depends on where you are. As I said early, you must login before to create a new post. In the following screenshot, we see clearly that there is a black bar at the top of your screen with, on the left, same icons that refer you to the functionalities and the the right your avatar. If you see your avatar, it means you logged in the website. Good start!
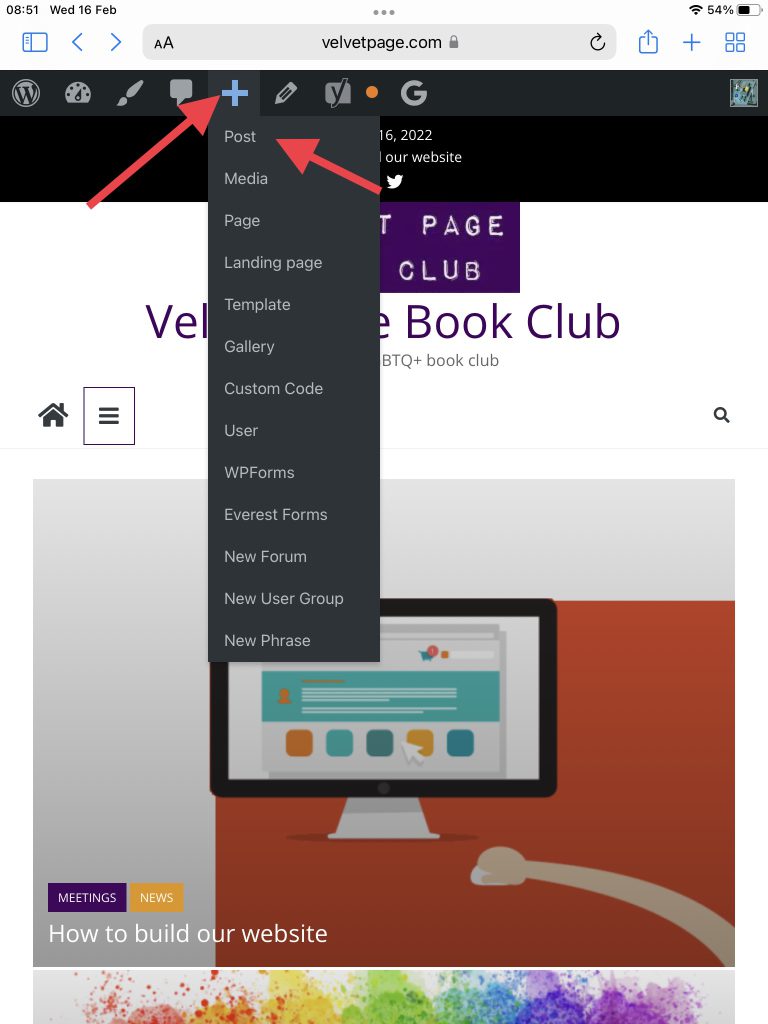
Now, if you navigate the website and want to create a new post, you have to tap or click on the + on the top bar. So, a menu appears and then click on Post. This redirects you to the edit page.
Now, there is another way. There is always another way. Hopefully you are curious and browsing around. So, browsing around, you find yourself in the admin section of your account. On the left, you have the full menu of all the functionalities that the website has. If you don’t see the menu on the left, don’t panic! On the top left, there are 3 lines. Tap or click on them and the menu will appear.
Now, you have an option Posts. Tap on it and one of the following 2 things could happen:
- A small menu appears with with same options
- The page is realoded to show you same options
Whatever happens, you see the following options:
- All posts
- Add New
- Categories
- Tags
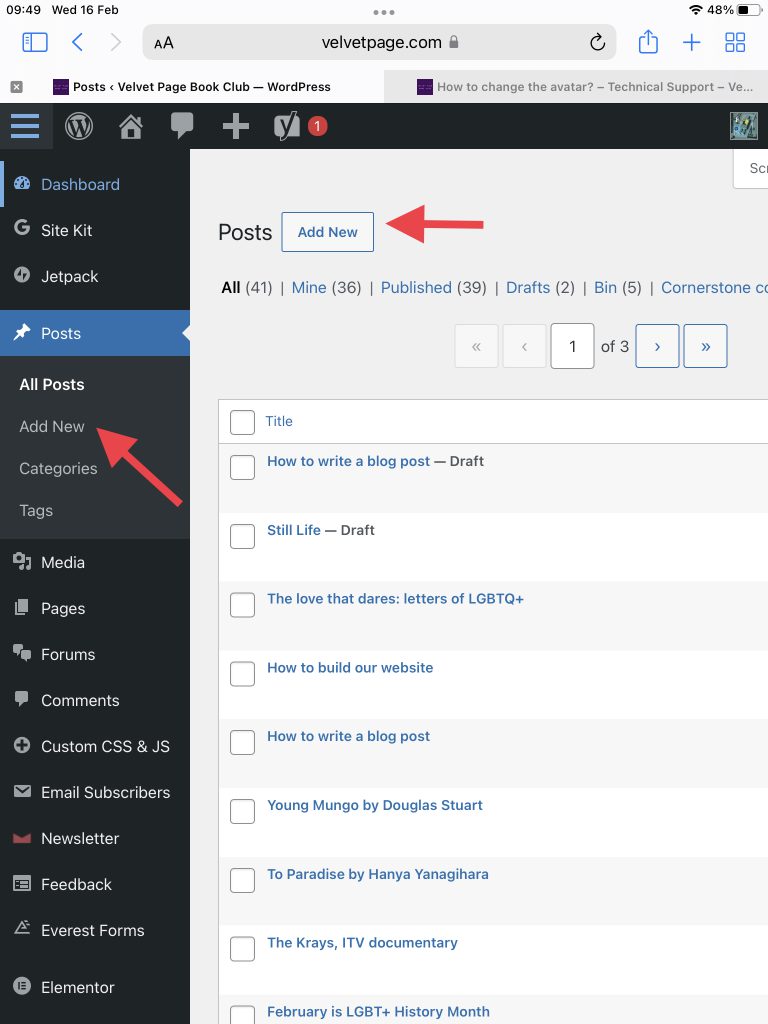
So, if you want to create a new post, click on Add New, If you are curious and you tap on All posts, you see the long list of posts in the website (don’t delete anything). Now, at the top near the title, you have a button Add New. Tap or click it and you will be redirected to the edit page.
The editor
So, how to write a blog post? As you can see in the following screenshot, the new post is basically an text editor like Microsoft Word, for example. There are a lot of functionalities in this editor but I will show you only the most important to not create confusion. Obviously, you can explor everything and try everything. Nothing bad could happen. But don’t delete anything!
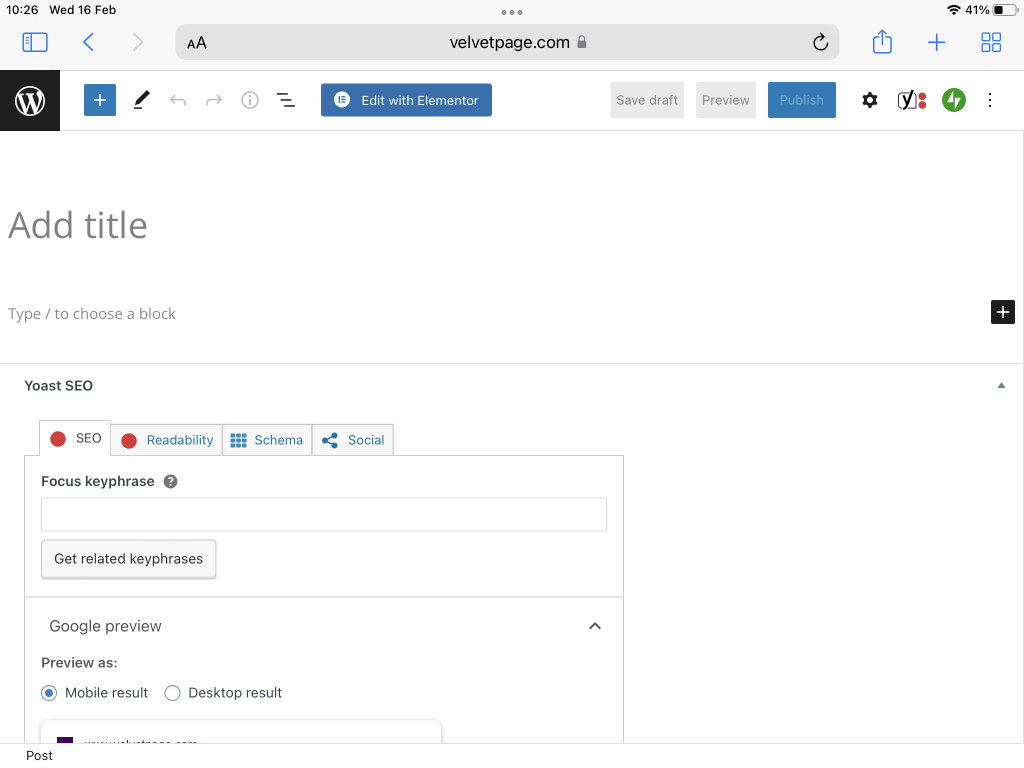
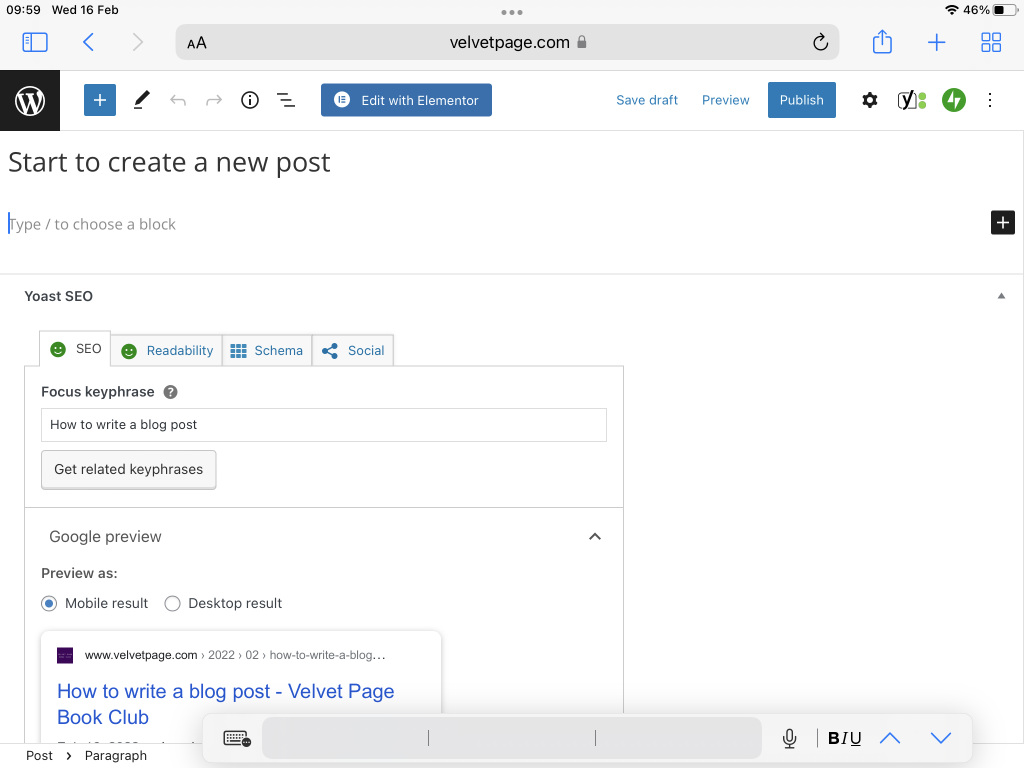
First, choose carefully the title of your post. The title should have maximum 5 words without signs (such as commas or semicolumns if it is possible). More that 5 words for a title is a poem not a title! Also, it is quite important for the search engine like Google: a long title could exclude the post for the results. So, nobody can see it and then you are wasting your time.
Although, I show you later the SEO section, copy the title in the Focus keyphrase.
Now, there are same important functionalities to understand and few tricks that help you to work better in writing your post. Let me break them down for you.
What is a block?
The WordPress Editor uses blocks to transform the way you create content, turning a single document into a collection of discrete elements with an explicit, easy-to-tweak structure.
The Block editor brings you an effortless post-building experience. With blocks, you can quickly add and customize multiple media and visual elements that used to require shortcodes, custom HTML code, and embeds.
A basic example of a block is a paragraph of your post, a bullet list or an image. When you type your text, WordPress automatically creates a block for you. If you press Return, WordPress automatically creates another block for you. After that, you have some options and configuration for each block. The best way to learn the blocks and their configuration is to play with them.
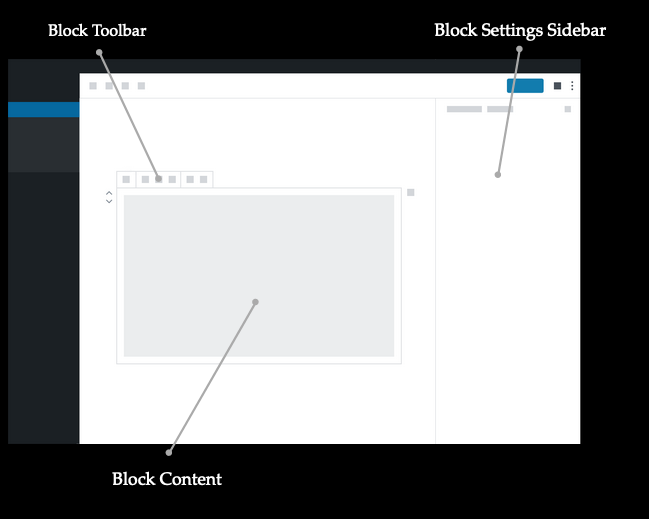
Anatomy of a block
Each block consists of a Block Toolbar, a Block Settings Sidebar and the Block Content. Depending on the block’s purpose the buttons of the Block Toolbar will change and so will be settings items in the Block settings sidebar. All the core blocks are divided into three sections:
- Block Content is the space where you put your content such as your text or your images
- Block Toolbar is toolbar on the of your block that helps you to format and/or organize your block. For example, in a text block, you can change the font or add bold to same words
- Block Settings Sidebar is the collection of full list of options or functionalities for the block. For example, for an image you can select the alternative text, the size, same effects and so on.
Adding a Block
There are many block types for you to choose from, which you’ll see organized by category and by most recent use. You can edit or move each block independently of other blocks, and individual blocks sometimes come with their own formatting settings for even greater control over layout and function.
So, WordPress has a lot of blocks for every kind of needs. You have a full list on the WordPress website.
Configuring a Block
Now, each block has its own settings. To find them, select a block: this will reveal a toolbar at the top of the block. You’ll also find additional settings in the sidebar to the right of the editor.
The settings at the top of the block usually include formatting options as well as the option to change the block type ([1] in screenshot below).
In the editor’s sidebar you can switch between settings for the current block ([2] in screenshot below) and settings for the whole document ([3] in screenshot below).
The Document Settings is where you can add tags and categories, choose a featured image, see and change the status of your post, and more — these are options that apply to the page or post as a whole.

You can click the cog icon at the top right of the editor to show or hide the settings column ([4] in screenshot above).
What if you’d like to change a block type? No problem: you can transform each block to another similar or related block type. For example, change a paragraph to a heading, a list, or a quote.

Removing a Block
To remove a block, select the block and click the three dots right above it. Among the settings there you’ll see the option to remove that block.

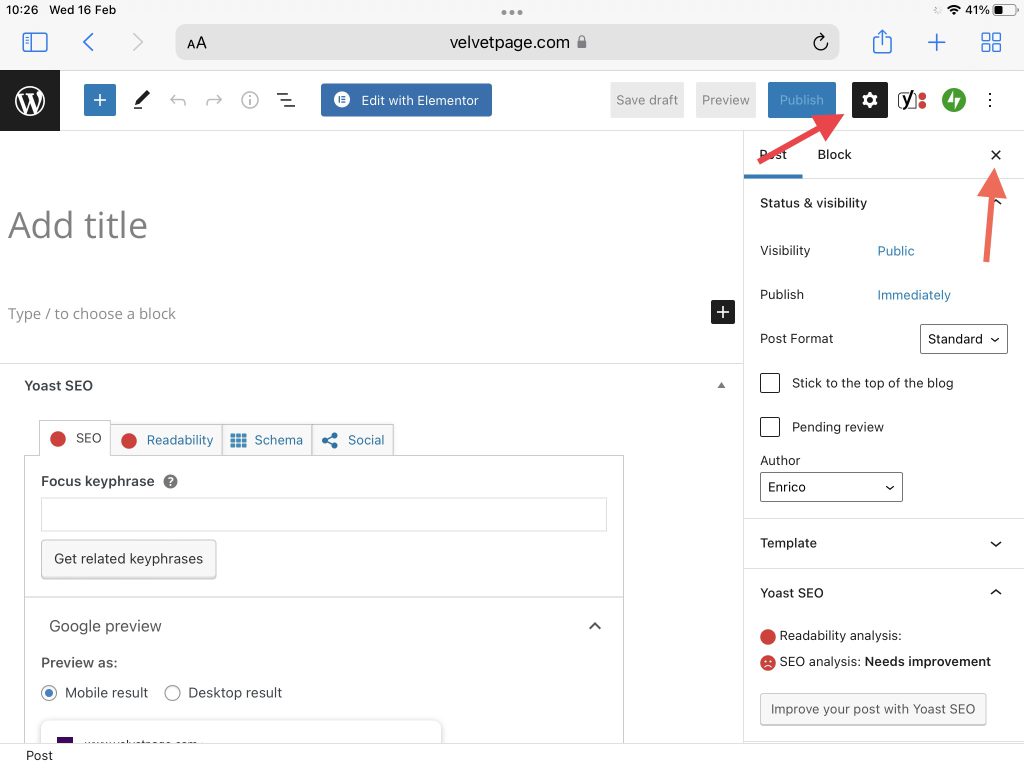
Show post settings
As I said early, I use my iPad to write this post. The iPad doesn’t have a big screen and sometimes you want to see better and bigger what you are writing. For this reason, it is possible to hide or show the settings of the post (and block).
As you see in the screenshot below, on the top right there is a gear with a black background. This icon tells you that the settings are shown, exactly what you can see in the screenshot (the red arrow points to the icon).
If you want to close the settings to have more space, you have to tap or click on the X (in orange). Now, the gear doesn’t have the black background anymore and the settings are gone. If you want to see them again, click on the gear (red arrow).
Select a category
Next step in how to write a blog post is to define in what category or categories you want to place your post. In the post settings, you have section call Categories. In the screesnhot below, see the red rectangle. This shows a list of the categories I created for the blog. You can add more if you like. At the moment, the organization of the home page is based on this categories.
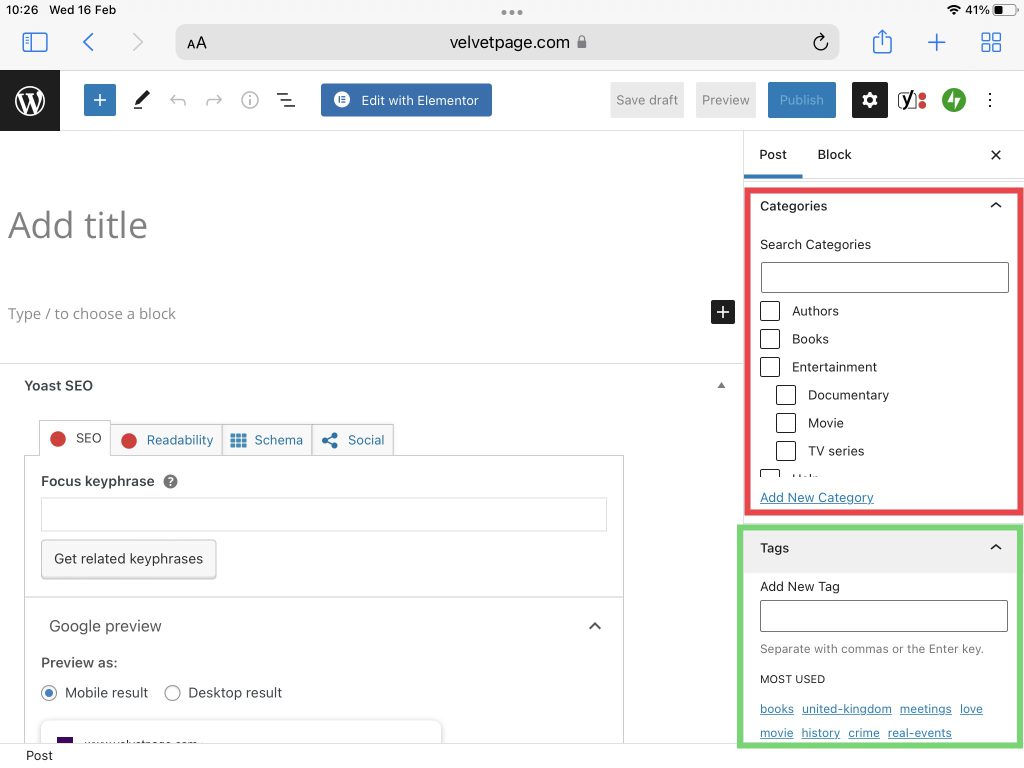
When you select the categories, use only the most important related to your post for a maximum of 3. It is useless to select more categories and people can be confused to see the post everywhere.
Tags
In the screenshot above in the green rectangle, there is another section related to Tags.
Tags are one of the default taxonomies that can be used to organize your blog posts. They are normally made up of one or two words and describe specific details of a post.
For example, if you wrote a post about a book, then you could use tags to describe the author, publisher, and topics covered.
Tags improve the usability of our site by helping visitors quickly find a specific subject without needing to scan all of your posts.
So, choose carafully your tags. When you type, you could see some suggestions based on the tags are alreasy created. All tags are lower case (for example, LGTBQ is lgbtq).
If your tag is made by two or more words, like World War II, please use the - to separate the words like world-war-ii.
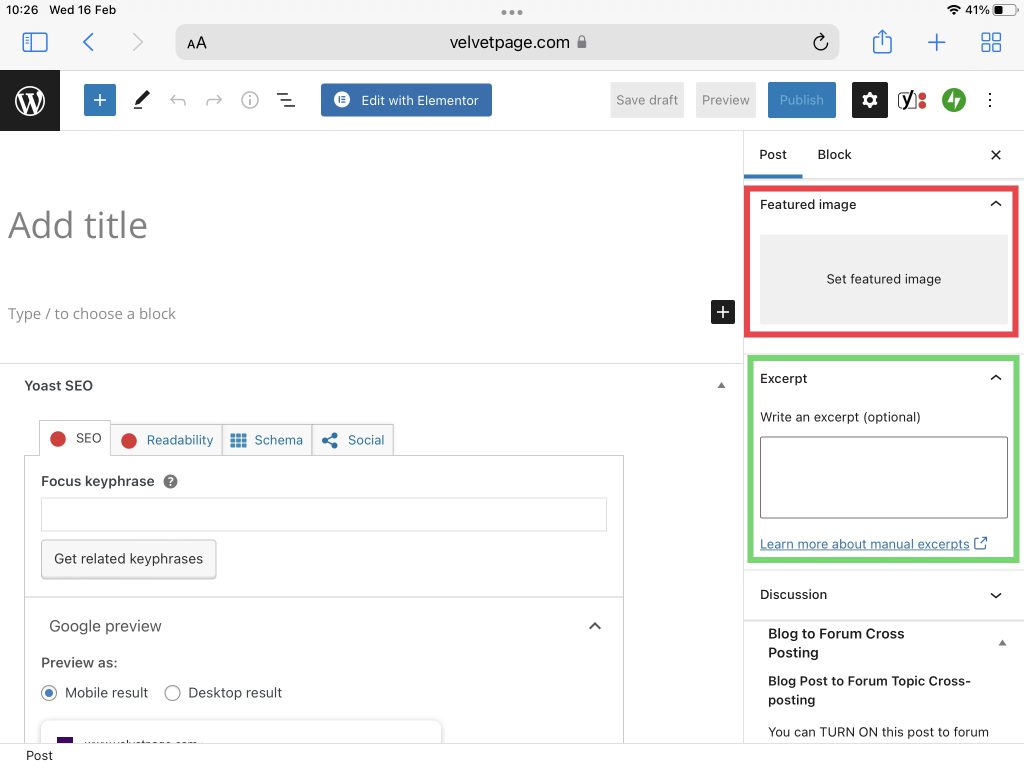
Featured image
Now, this is the exciting part. The featured images is the image that is the essence of your post (section in red on the screenshot below). Itis the image that the blog displays to identify your post. Also, this is the image that social media like Facebook or Twitter use as preview of your post.
So, choose carefully this image. There are a lot of free licence images to use on the internet. For example, you can take a picture of the cover of the book.
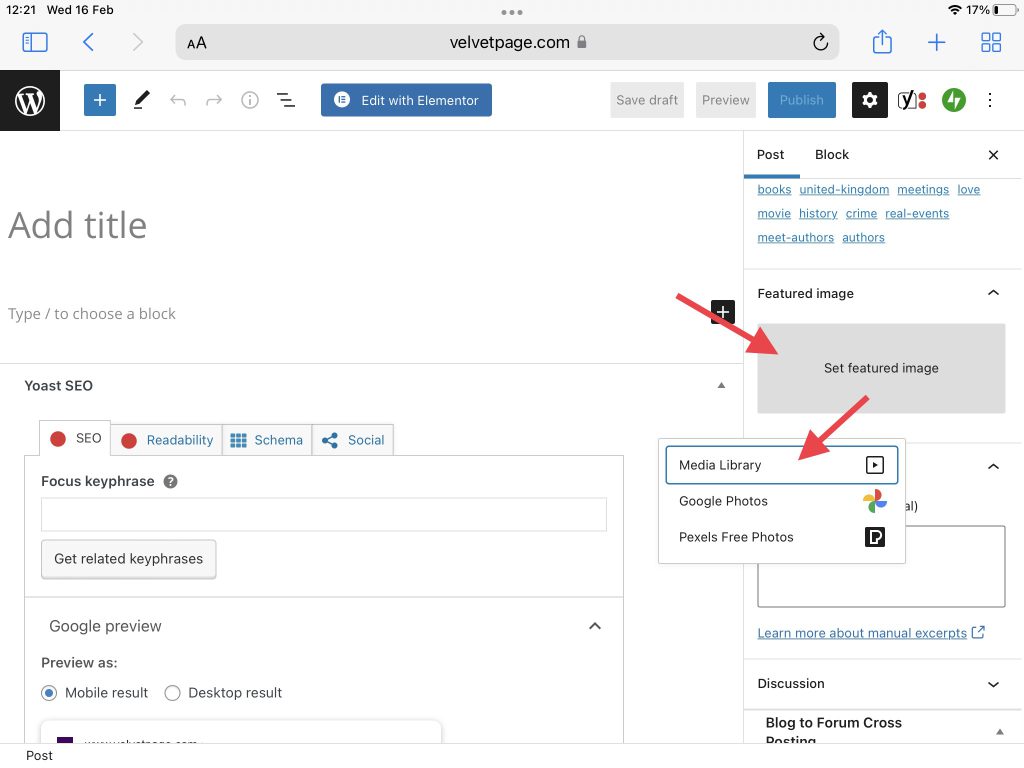
Now, to add a new picture or photo is quite easy. I show you in detail how to do it in the section Add an image. For now, you can tap or click on the big grey box Set featured image. So, a menu will appear and select Media Library.
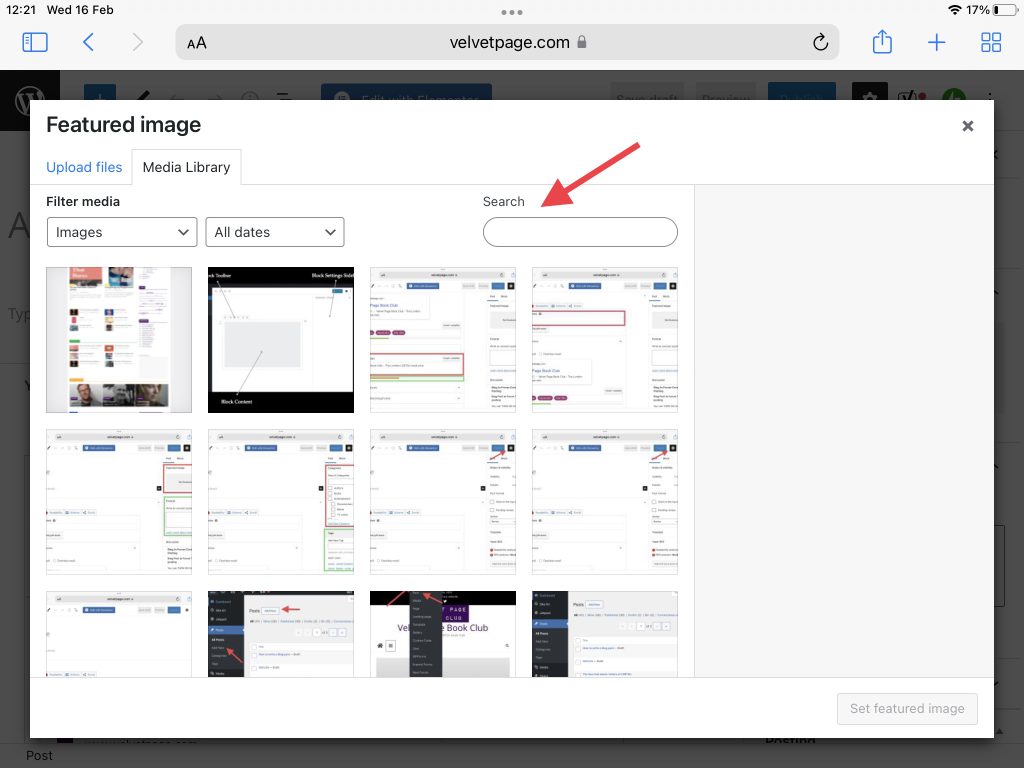
The Media Library is the collection of all the pictures in the blog. There are a lot of them. If you don’t want to use a new image, you can search for one. Type your text in the Search text box. The search is applied to the name of the images or description or alternative text. You can add or amend this settings at any time.
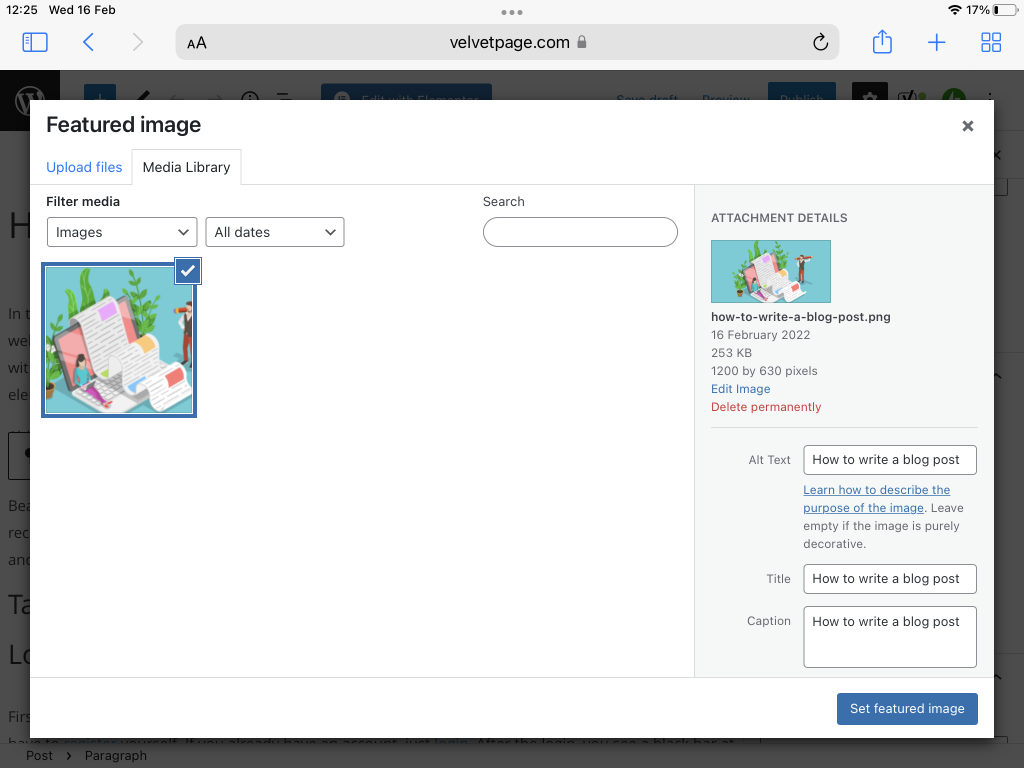
Then, if you like an image to use, just tap or click on it. You see the image has a blue border and a check on the top right. Also, you have all its details on the right. You have the Alt Text (Alternate text), Title, Description and Caption.
Then, if everything looks right and you want to add this image, press on the button on the bottom right Set featured image.
Excerpt
Now, next step in how to write a blog post is to add the excerpt (in the green box). I know this is optional but it is quite important. The excerpt is a brieft summary of your post and it has to contains maximum 160 characters. This is shown in the home page, in the social media as the description of the post, and in the weekly newsletter.
So, be careful in what you are writing there because it is massively important. If you are not sure, please ask or leave a message in the community.
SEO (Search Engine Optimization)
Now, this is a bit tricky part and it is optional, at least for now. When your post is ready, ask me to do or review this part.
So, SEO stands for search engine optimization, which is a set of practices designed to improve the appearance and positioning of web pages in organic search results. Because organic search is the most prominent way for people to discover and access online content, a good SEO strategy is essential for improving the quality and quantity of traffic to your website.
We are creating this website to support our book club but also to share with other people the books we love or the movie we enjoy. So, we want to involve people and know what they think and what they recomment to us, although maybe they are far away. We are still part of a very big LGBTQ+ community, any way! It is always a pleasure to know that someone reads what you write.
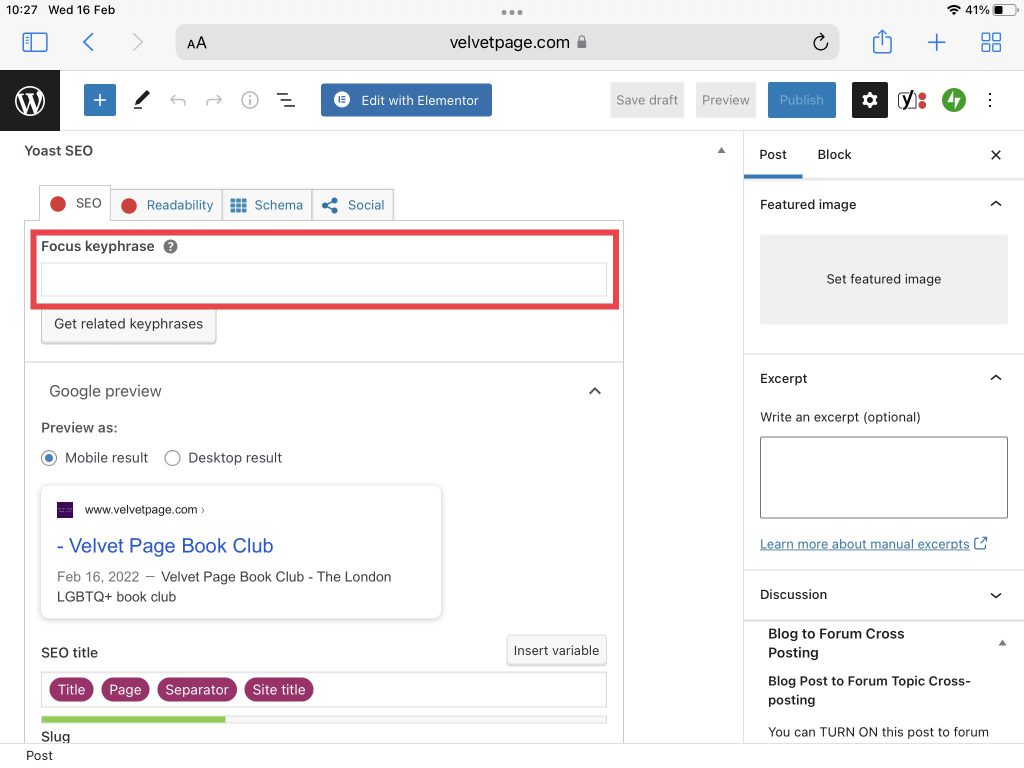
For this reason, we have to do an extra mile. As I said at the beginning, the Focus keyphrase is basically the tile of the post. Just copy and paste.
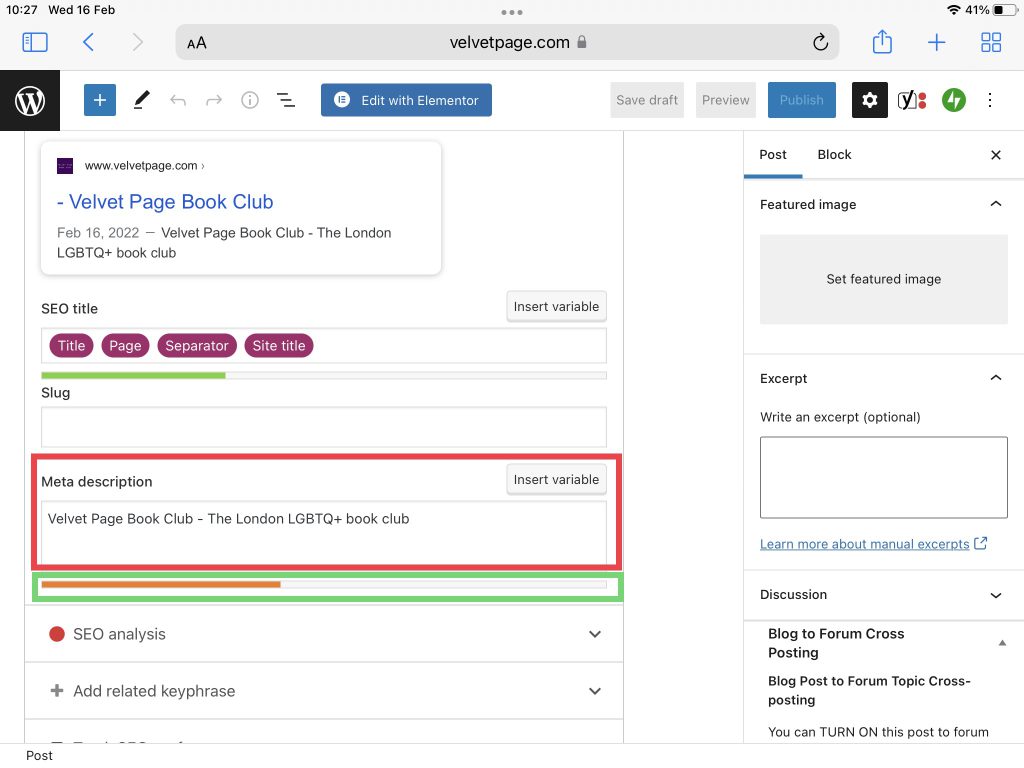
Now, the meta description section. I give you a partial definition of what it is but is good enough. This is the text every search engine like Google or Bing will display for your post in the result list. Also, this is the text the social media like Facebook or Twitter will display when you post is shared. That means, it is important that in few words you capture the curiosity of the user, so, he or she wants to read more and click on the link.
The meta description is in the red box in the following screenshot. It must be maximux 160 characters and it has to conteins the title of the post. Underneath, in the green box, you can see if the meta description is good enoug. If the bar is orange (like in the screenshot), it is not good enough, you can do better. If it is green, you are a star!
To help you to understand the result in the search engine or in a social media, immediately above the SEO tile, you have a preview of the result.
General best practice on writing a post
Now, the following points are only for your guidance. There are a lot of posts on the internet about it. The important think to bear in mind is the content is the most important part. But, most important, you should have fun with it!
The importance of a title
Writing a catchy title can help people get interested in your post. In an academic context especially, it might be good to show your audience that your content can be just as entertaining as a good book or social media. Make sure you reveal the theme of your content in those first words. Be wary: being catchy does not mean turning to clickbait. It is favourable if your reader knows exactly what they will be reading about in this context.
Spoilers can be good!
This counts for more than your title. Don’t tease your audience and wait to tell them exactly what they’ll be reading about: state your theory, argument or theme from the very beginning. You might want to use headlines and summaries to give readers a little snapshot of what your writing will consist of.
You talkin to me?
Decide on a tone for your blog. It is true that writing for an academic blog is not like writing a dissertation. However, this does not mean it is the same as writing a caption for an Instagram picture of your holidays. It is crucial that you reflect on who your audience is going to be and adapt your tone to match that. Make sure your blog posts are honest and relatable – if people are reading a blog about your theme and not an article, it is to get a sense of the author as well: don’t forget to be you.
Make your content scannable
How are you going to organise your thoughts? There are different ways to blog. Some might prefer to directly address the audience and mimic direct speech whilst others might want to narrate in a reflective manner. This is a decision you can make based on the type of blog you will decide to use. A key point to structuring and formatting your blog is to make it scannable: people will get a visual idea of your blog before they even get to reading it.
Oh I just skimmed through…
Keep your paragraphs and sentences short: most people only read 20% of a page. Having fun with language can be fantastic but simpler writing will help people relate to what you are telling them whether they know about the subject at hand or not. Use headings to break your page up so it is easier to scan.
What is that about?
Asking your readers questions can be a great way of involving them. When writing, ask yourself ‘why should they care?’. You don’t only want to be recounting your thoughts, you want to be sharing it with other people. Making the reading experience more interactive will make people feel involved and interested.
Make it visual!
Adding media to your blog can be another great way of making readers relate and feel part of your experience. Visual tools can help your reader see what you are describing, but they can also give them the opportunity to relax from the reading effort. This is especially the case if your writing is a quite dense academic text. Images add an interesting opportunity for formatting, structure and narration.
Proof-read, get critical and edit!
This is perhaps most people’s least favourite part. Sadly for you it is essential: proof reading and editing your text will help you cut out pieces that aren’t useful. Getting a friend/colleague to read it for you will give you another perspective on your work and enable you to assess whether you have written for the right audience. Do not be afraid to ask for feedback. Getting feedback should be a very constructive and helpful process.
Archiving appropriately
There is nothing more confusing for readers who are looking through your content than having a monthly site archive and no search bar. Make sure people can find what they are looking for without having to click a million times. Categorising and tagging posts is not time consuming and can be really helpful for your audience.
Don’t let readers forget about you!
Posting regularly and promoting your work is especially important if you want people to visit your blog regularly. Creating a schedule might help you keep on track – because posting regularly means you have write regularly. Thankfully, there are many ways for you to promote your work other than relying on loyal readers. Social media links and enabling search engines to index your blog can help so make sure that you explore your settings to maximise your crowd.
Add links
Links are important in a blog because they are shown how consistent is a website. For example, you can be inspired to read another post, so, you can mention it in your post and insert a link to the other post. Or the post is about a book of an author, so, you can link to the author page.
To add a link, select a word or more than one. Then a contextual menu appears and you can see a chain.
Tap or click on the icon and you can paste the link or search for an internal link. If you search for internal link, type few characters and the website shows you the list of posts related to the search. Tap or click on the link and the selected words become a link to the other page.
Add a new image
Now, I’m sure at this point you want to ad an image in your post like the cover of the book you are reading or sharing a moment when you are reading the book. So, how to add a new image in your post? Here it is the point where you are putting everything together.
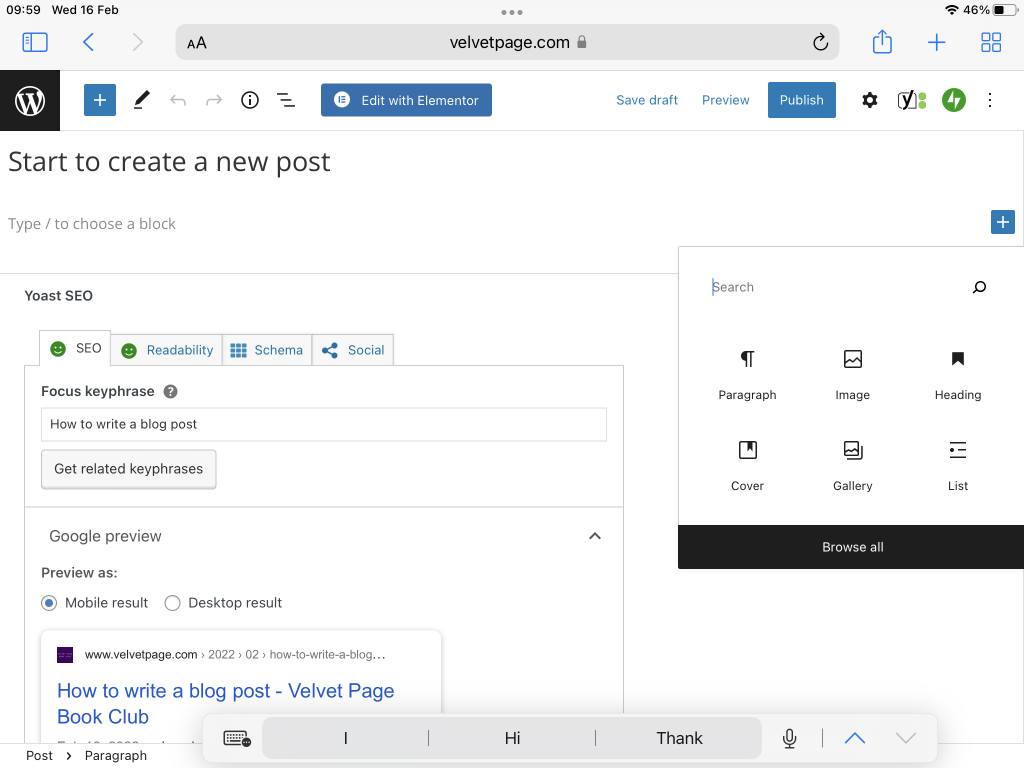
First, tap on the new line like in the following screenshot. If you are using a laptop, just move your mouse between blocks and a big + with a blue line will appear. Now, you can see the plus; in the screenshot below is a + with a black background. Tap on it.
If you tap in the correct way, you see a box with 6 blocks and also you can search for other type of blocks. I already have installed a lot of blocks and I’m sure you can find everything you think you want. If not, let me know and I will add it. Now, it is straightforward: tap on the block Image.
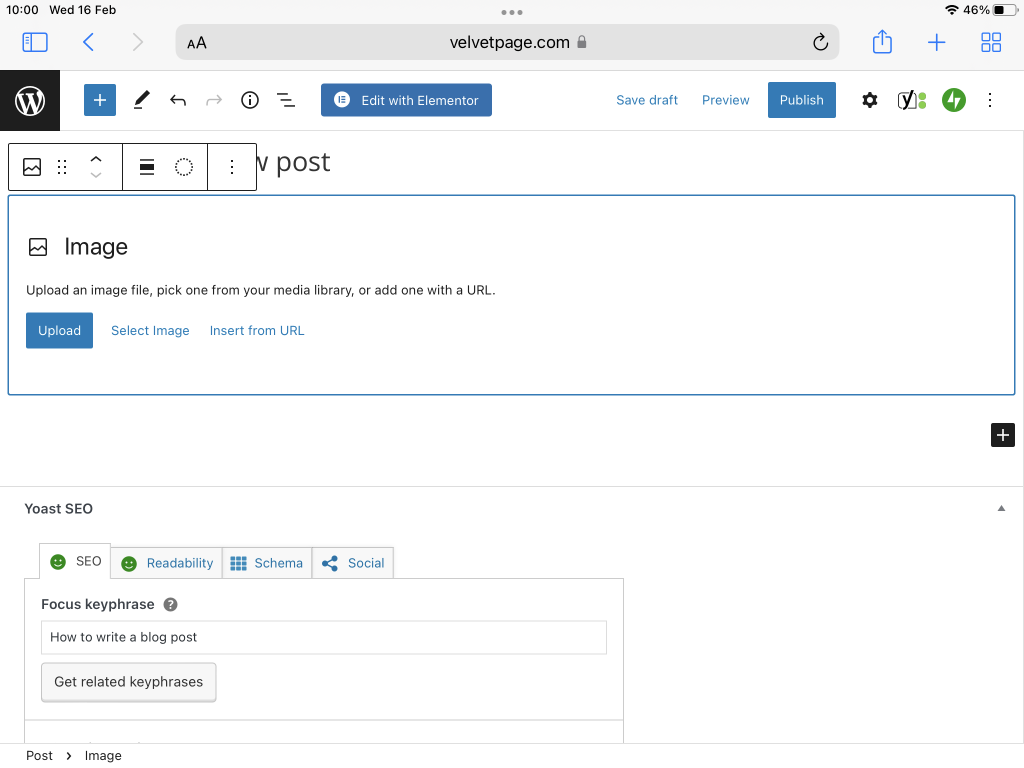
After the tap, you have a new block in your post. Usually, I like to have all the images centered in the page and for that you can apply the correct format. Don’t worry, you can play alone. So, you have few choices:
- Upload a new image for your iPad or laptop
- Select Image from the library in the website
- Insert from URL an image, for example a book cover from another website
The option I’m showing you is to Upload an image. For example, you take a picture with your iPad and you love to use this picture in the post. So, tap or click on the button Upload.
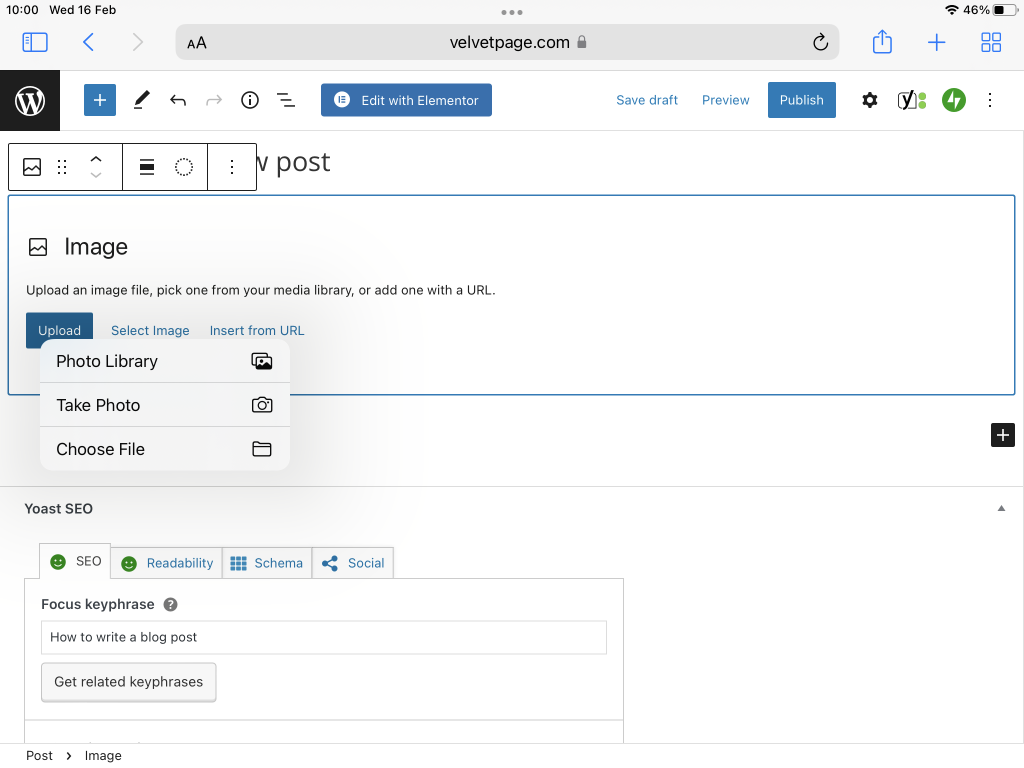
Now, if you work on your laptop, after clicking on the button, the website immediately open your file explorer and then you can select the picture or photo you want to upload. For this post, I said, I want to use an iPad, so, it is a little bit longer. Now, you see 3 options:
- Photo Library
- Take Photo
- Choose File
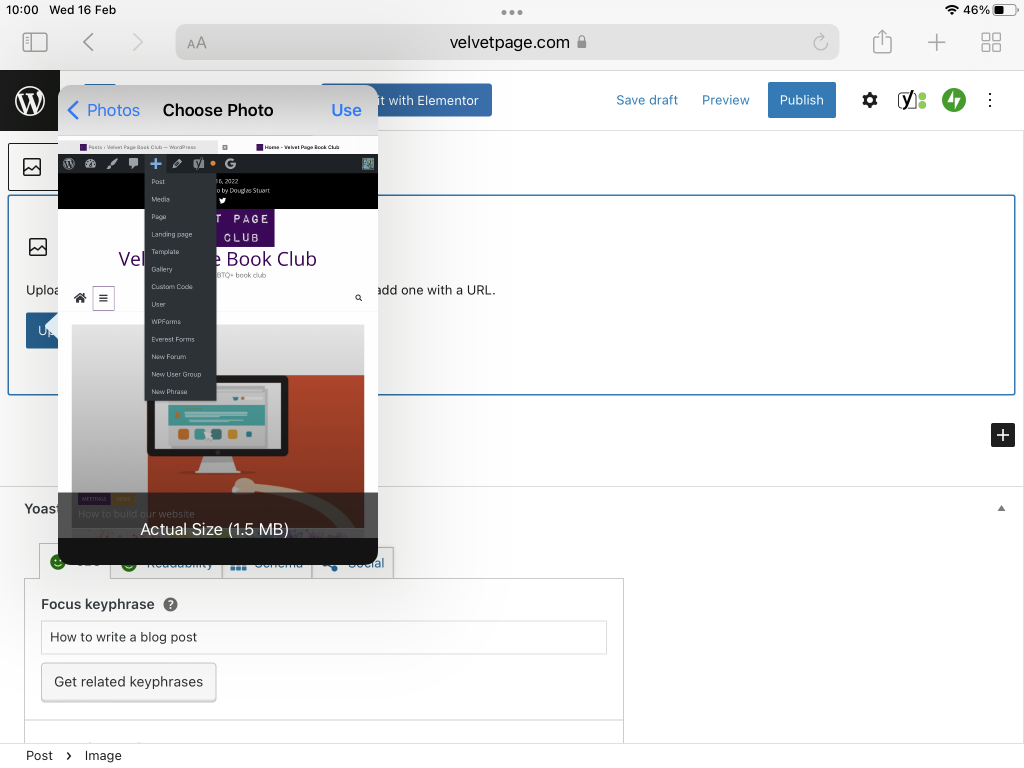
In my example, you have already took the photo. So, I’m going to choose Photo Library.
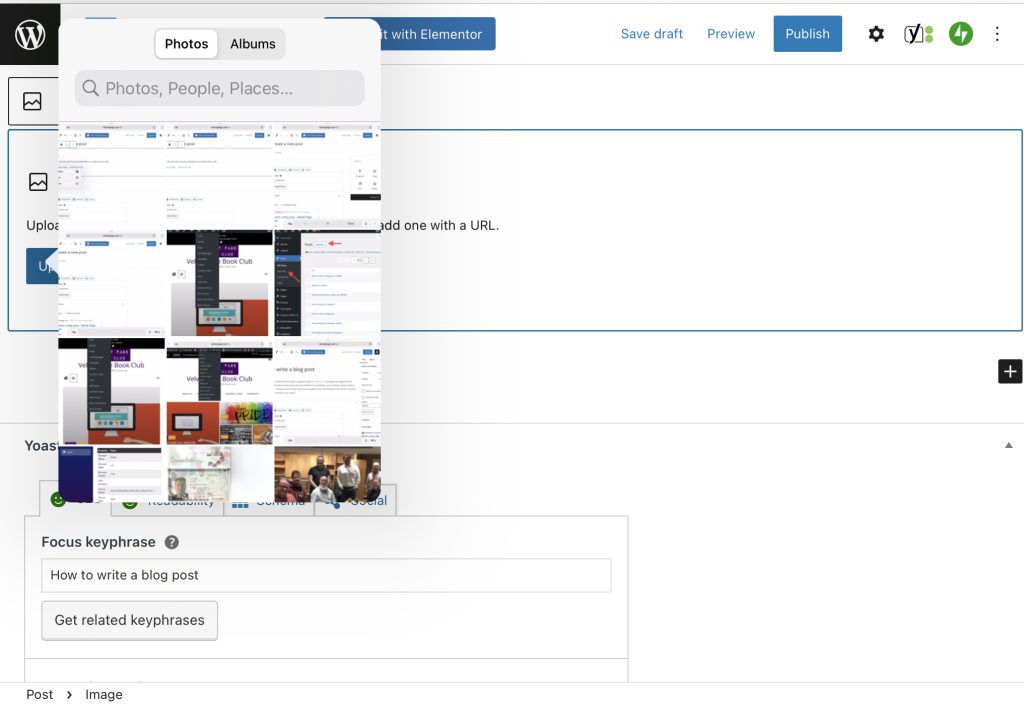
After that, you have to opportunity to browse the Photos in your iPad or your Albums, search for a particular photo and so on. This is the iPad window, so, use it as usual. When you find the photo you want to use, tap on it.
So, I selected a photo from my library. Now, iPad shows me the preview and it asks for the confirm if I really want to it in the post. Click on Use. After that, the photo will be uploaded in the website and also you find it in the Media Library.
Remember that all the picture are shared with everybody. So, don’t upload very personal or inappropriate pictures
Now, you can continue to edit your post! Your post is beautiful with images, much easy to read and involve more your readers.
Anatomy of Velvet Page Home Page
The last thing I want to share with you in this post is how the Home Page is created. So, there are different sections of the home page; each section has a clear title and all the posts are related to that. To define each part, I use the Categories. So, when you publish a post in the Meeting or News category, for example, the website will display this post at the top of the page, in the section immediately under the menu.

Going down, the next section is Books. Do you guess what kind of posts are displayed here? In this section, the website displays the last 8 posts in the Books category (this category has the colour light purple). Then, Latest posts in green displays the last 6 posts regardless the category. So, the important Authors category (in orange) where we talk about the book’s author we met. Then, All posts (in blue) display all the posts regardless the categories. The last part is related to entertainment in a dark orange: here you have all the posts related to movies, TV series and documentaries.
Save draft
After all this work, you don’t want to lose your post. The website automatically saves on your local machine (laptop or iPad doesn’t matter) every single change. So, you don’t lose anything but it is in your local device. The option Save draft, it saves on the server your post. That means, if your iPad is running out of battery, you can continue to edit your post in an another device. The website saves all the changes for a post and that creates the history of the post. So, you can restore an older version of your post at any time.
Preview
So, are you curious to see how the post looks like in the website design? The Preview shows the post in the frame of the website. This operation could take a while.
Publish
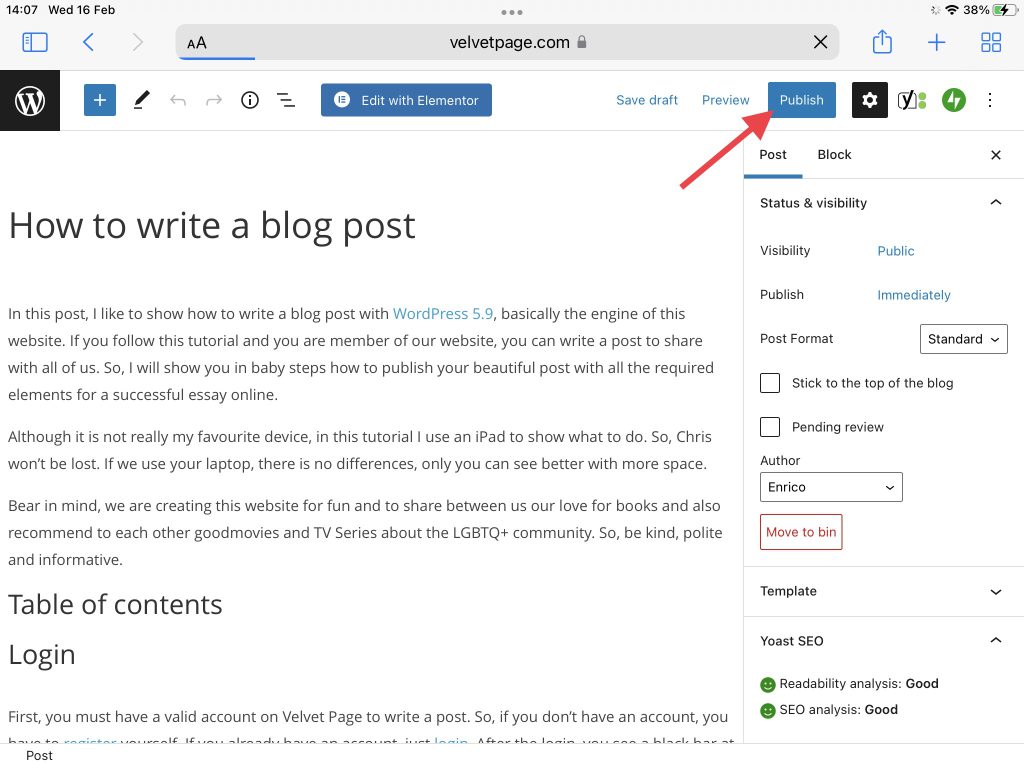
We are ready to go! So, your post has everything you want: you talk about the book, you add your amazing photos, and now we want to share it with the world. First, review if the Focus key phrase, the meta description the excerpt is completed and nice. If the answer is yes, on the top right, tap or click on the Publish button.
Then, you have to review all the settings of your post such as when you want to publish it. If everything looks fine, click again on Publish.
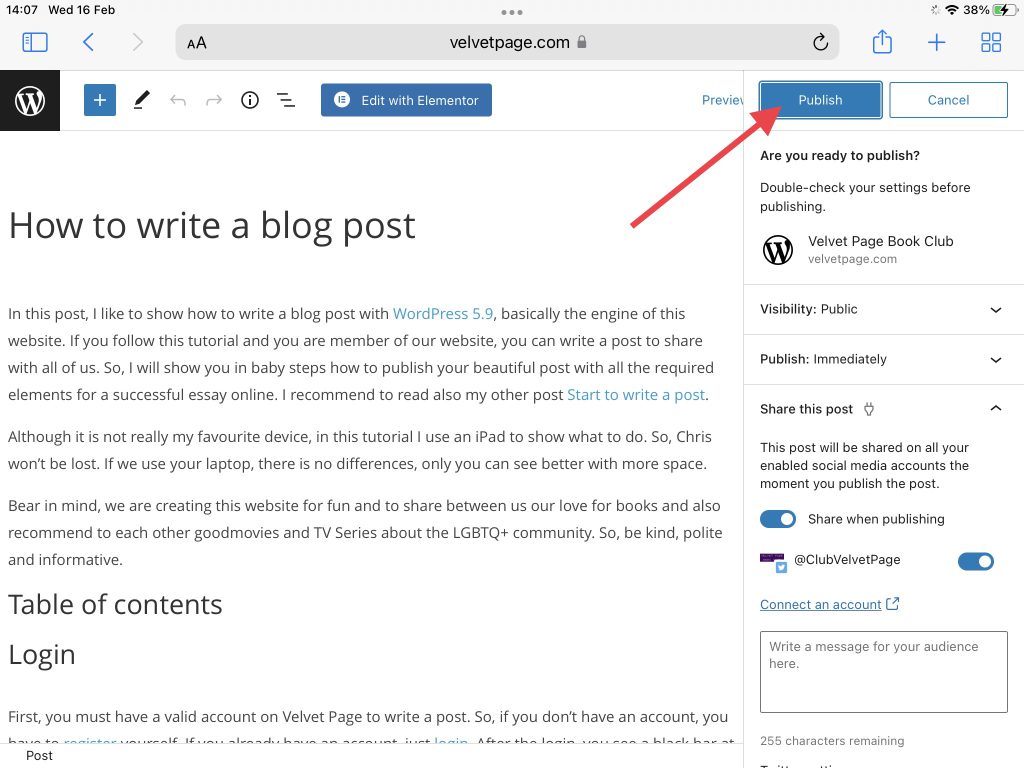
In few seconds, your post will be online and, automatically, all the social media will share your post on their walls. Also, the website sends an information to the search engines that there is a new post and then they add it to their catalogues.
Good job!